
We’ve covered a lot in a short period of time here in Season 2 on Creating Systems, and at this point, you might feel as though you’ve taken a ton of great notes and you’re excited about creating these systems… but you haven’t actually taken the first step.
Documenting your systems
Or perhaps you have taken the first step, but you’re not actually seeing the results of the system you’re creating because they haven’t technically been ‘put to work’ yet.
The execution
This happens to us at conferences a lot: we get overloaded with a ton of great ideas, we takes pages of notes, and we gather all kinds of inspiration from those around us. And then we go home and we’re lucky if 5% of what we just learned is actually implemented.
When I realized this was happening to me, I made it a point to only focus on ONE thing when I got home from a conference.
This didn’t mean that I wasn’t going to still have the other ideas, or be inspired by all the experiences I had; it simply meant that I was going to find a way to execute on just ONE strategy I had learned within the first 24 hours of returning home.
This is the reason why we chose just ONE task or project from our list and wrote out the steps for just that ONE task or project. And now that you’ve identified the efficiencies within each step of that task or project, it’s time to execute it.
My goal with this post and episode is to give you a plan you can execute so that your ONE system is documented and ready to implement now.
From steps & efficiencies to a working system
You should have a list in front of you that contains each of the individual steps you take each time you do the task or project you chose to focus on first.
Each of those steps has an efficiency category applied to it: automate, delegate or batch.
As a reminder, we’re focused on recurring tasks or projects at this stage. If you’re working on a 1-time task or project, then we’ll be covering how to apply the SCRUM method in the future (although this post will get you headed in the right direction now).
Now, we move from steps and efficiency categories to actually creating a working system, and in order to do this, we’re going to document the system.
Let’s take our example of creating a social media strategy for Facebook.
We listed out 6 steps we take every time we work on our Facebook task, and we gave each of those steps a category, like this:
1. Determine when (the frequency) – set a frequency, then TRASH
2. Curate content – DELEGATE or BATCH
3. Create the actual post – DELEGATE or BATCH
4. Find an image (or create one) – DELEGATE or BATCH
5. Schedule the post – AUTOMATE (via DELEGATE or BATCH)
6. Engage with my followers – BATCH
Now, we need to document how this system will work by:
- Writing out the ‘how’,
- Scheduling the delegation, and
- Applying date and time parameters to those things we’ll be doing ourselves.
The documentation
Writing out the how
Writing out how you will actually do each step is an integral part of the documentation process. Understanding how your system will actually work is critical.
Let’s first determine how we do each step, and then we can decide how we’re going to apply our efficiency.
1. Determine when (the frequency) – set a frequency, then TRASH
This is up to you, as the business owner, to decide.
What frequency makes the most sense for you and your business?
What frequency makes the most sense for your audience and followers?
Let’s say you decide to post 2 times per day on your Facebook Page, and for now, that is the extent of your Facebook strategy.
There should be a meaning a purpose behind this decision, and this is a good time to state that meaning and purpose.
For example:
My Facebook strategy is to provide both inspiration and step-by-step instruction to my followers 2 times per day, 7 days a week = 14 posts per week. One time per day, I will share content that gives inspiration, and one time per day I will share content that gives step-by-step instruction.
2. Curate content – DELEGATE or BATCH
Let’s say you don’t have a team or anyone to delegate to just yet, so you’re going to batch this step.
For example:
When I look for content from other sources for inspiration and/or step-by-step instruction, I have my Top 5 sites I like to visit.
My Top 5 include:
SmartPassiveIncome.com
JamesClear.com
TimFerriss.com
AmyPorterfield.com
ScrewTheNinetoFive.com
When I visit these sites, I go to the blog tab first, then I check the podcast tab (if applicable), and I scroll to see what has been published recently that might be helpful for me and my followers.
When I do find a piece that’s helpful, I copy the URL and I put it under a heading in my Workflowy document titled “Things I Want to Share / Refer Back To”.
Because I know I need at least 7 pieces of content per week from others that I can share on my Facebook Page, I’m going to schedule a time slot to create an initial bank I can revisit in the future.
By visiting these sites and going back in their archives to find past content I can share, I’ll be creating a bank of 25 pieces of content.
Moving forward, I will batch this step by scheduling a time slot once per week to go to these sites and continue building up my bank of content to share.
For my own content, I will simply share day by day 1 piece that I published that week – either a post or podcast episode. To give myself a head start, I will also schedule a time slot when I can start to build a similar bank of content to refer back to that includes only my own content.
**Add: when I find a post or podcast episode I want to share, I will also include the 1-liner I’ll use to help me create the actual post for Facebook
3. Create the actual post – DELEGATE or BATCH
Following suit, since we don’t have a team to delegate to, we’re going to batch this step as well.
First, we’ll write out how we create a post, and then we’ll decide how we’re going to batch it.
For example:
When I create a post for my Facebook page, I typically use a powerful 1-liner from the piece – something that really stood out to me and made me think, “YES! This could be powerful for my business!”
I then take that 1-liner, and I use it as a quote, which will either be the first or the last sentence of the post I’m creating.
Finally, I’ll create my own 1-sentence description or input that includes the ‘who’ and the ‘why’ (who I think this will be helpful for, and why it can be helpful for them).
Same with my own content, but instead of choosing a powerful 1-liner, I simply include 1-2 sentences about who I think this will be helpful for and why.
I will batch this step by setting aside time once per week to create the actual post.
Now that I realize this is how I create my actual posts, it’d be beneficial for me to add into my curation step that when I decide on a post or podcast episode to share that is from someone else I want to not only copy the URL, but also the 1-liner that caught my attention and made me want to share it in the first place.
Then, when I go to create the actual post, I won’t have to revisit the content because I’ll already have the content there for me.
4. Find an image (or create one) – DELEGATE or BATCH
This is another decision you, as the business owner, have to make. Is it important to you to have an image on every Facebook post you put on your Page?
If so, what would be the most efficient way for you have an image without spending precious time creating one yourself every single time you post?
For example:
I’ve decided that because I’m sharing content straight from others’ sites, along with content from my own site, that I will use whatever image auto-populates on Facebook – as long as it fits the piece of content I’m sharing.
If it’s obviously that an image hasn’t been selected by the creator of the piece, then I will post it without an image, or, I will go to my bank of stock images and choose one from there.
Of course, if you don’t have a bank of stock images, then you’d want to write in here how you’re going to start creating one. Or, if you do feel strongly about creating images for every post, then what type of process you’ll follow in order to make that happen (perhaps you could hire someone to create a template for you).
5. Schedule the post – AUTOMATE (via DELEGATE or BATCH)
Because you don’t have a team to delegate this to, you’re going to batch-schedule your posts.
Currently, you’re not doing much scheduling at all – it’s more of a laid back thing where you post to Facebook whenever you find a piece of content you want to share. Today, that changes.
For example:
Becuase I know I’m going to post on Facebook 14 times per week (2 times per day for 7 days), I’m going to choose 1 day during the week to schedule all 14 posts.
That means I’ll focus on scheduling 14 posts for the entire week at one time.
6. Engage with my followers – BATCH
This isn’t something you can automate, and it’s not something that should be delegated to a high degree.
For example:
Every day I’m going to engage with my followers on Facebook, but instead of engaging multiple times per day, I’m going to set a specific period of time just ONCE per day so I can batch my engagement.
Scheduling the delegation
If we were going to delegate any of the steps above, this would be the time to schedule an actual session to create the video tutorial of us walking through the process we’ve written out above.
For example, if you were going to delegate the curation, you would do a video recording of you going to each site, talking through why you’re choosing the specific pieces you’re choosing, and pointing out any specifics you want the person who is taking over to understand.
Great tools for recording these types of videos:
- Snagit
- Screenflow (my favorite)
- Camtasia
Then, you’ll want to schedule a time for that person to review what you’ve recorded, and if applicable, set aside time for questions and/or a ‘test run’ of that step to be sure they understand and feel comfortable with the instruction.
Applying date & time parameters
We now know how we’re going to execute each step, and we’ve also determined some of the time parameters we’re going to use for each.
This is where we bring the individual moving pieces together so they actually start working as a whole.
The overall execution for your new system might look something like this as you apply the date and time parameters:
Pre-work: 1 time only task to get my system running
Spend 30 minutes this Wednesday building my bank of content for my curated list, and then 30 minutes building my bank of content for my own list.
I’ve just scheduled this on my calendar for 7am on Wednesday.
Moving forward: how my system will run on an ongoing basis
Every Tuesday at 7am I will set aside 1 hour to work on my Facebook Page task.
During that 1 hour, I will:
Spend 5 minutes visiting my Top 5 sites and adding to my curated list.
Then I will spend 5 minutes gathering the 14 pieces of content I will use for the next 7 days (7 from my curated list and 7 from my own list).
Once I have those 14 pieces of content, I will spend 15 minutes writing the post for each.
Then I will open my scheduler, and I’ll spend 15 minutes scheduling out 2 pieces of content on each day.
For any posts that don’t have an image associated with them, I will spend a maximum of 5 minutes to grab one from my bank of stock images.
I will spend the remaining 15 minutes engaging with my followers on Facebook.
Now that you have your system written out and you know exactly how it’s going to work every time you go to do that project or task again, it’s time to put it into the format that will suit you best.
Let’s check out a few tools that can help you do this…
Tools for documenting your systems
There are so many amazing tools available to us that can help with documenting our systems, and which ones you use really depend on the type of documentation that works best for you.
You might love to have a simple checklist you can use every time you do certain tasks, or you might thrive off from being able to see the steps laid out visually – you might want to have a little of both so you can see a ton of detail.
So let’s start off with the most basic tools you can use to document your systems, and then we’ll move into the more advanced tools that can help you go really in-depth.
Basic tools
Google Drive
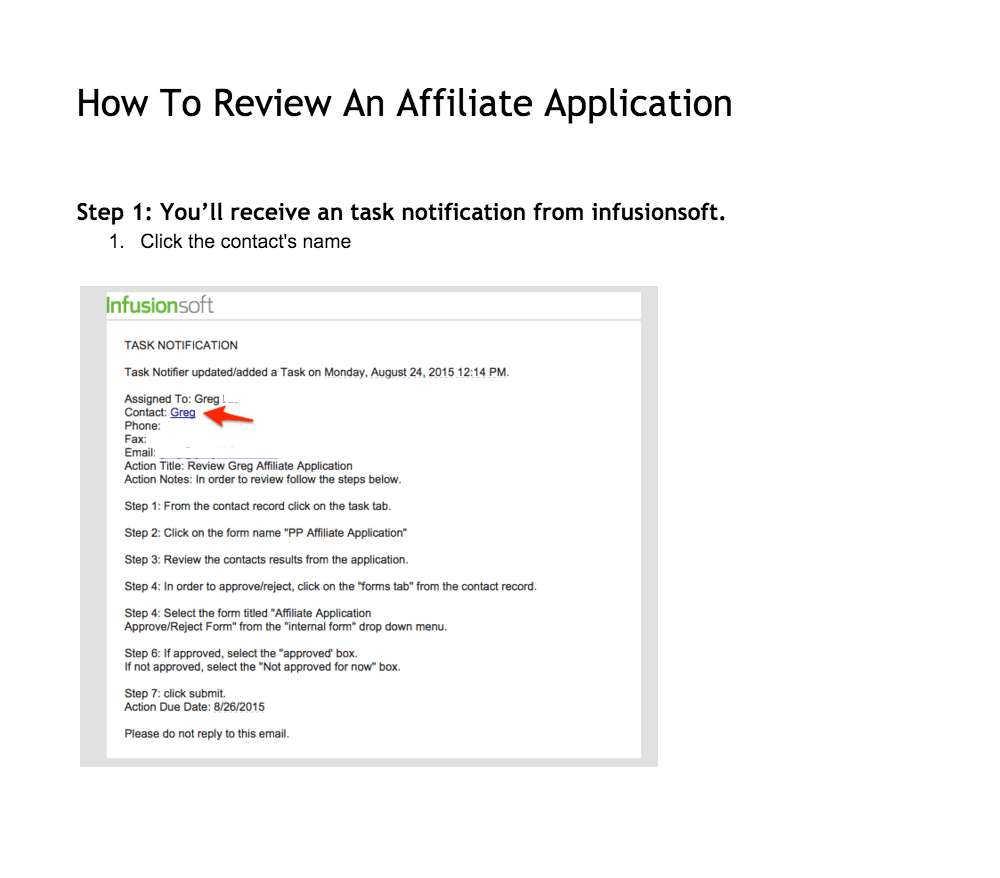
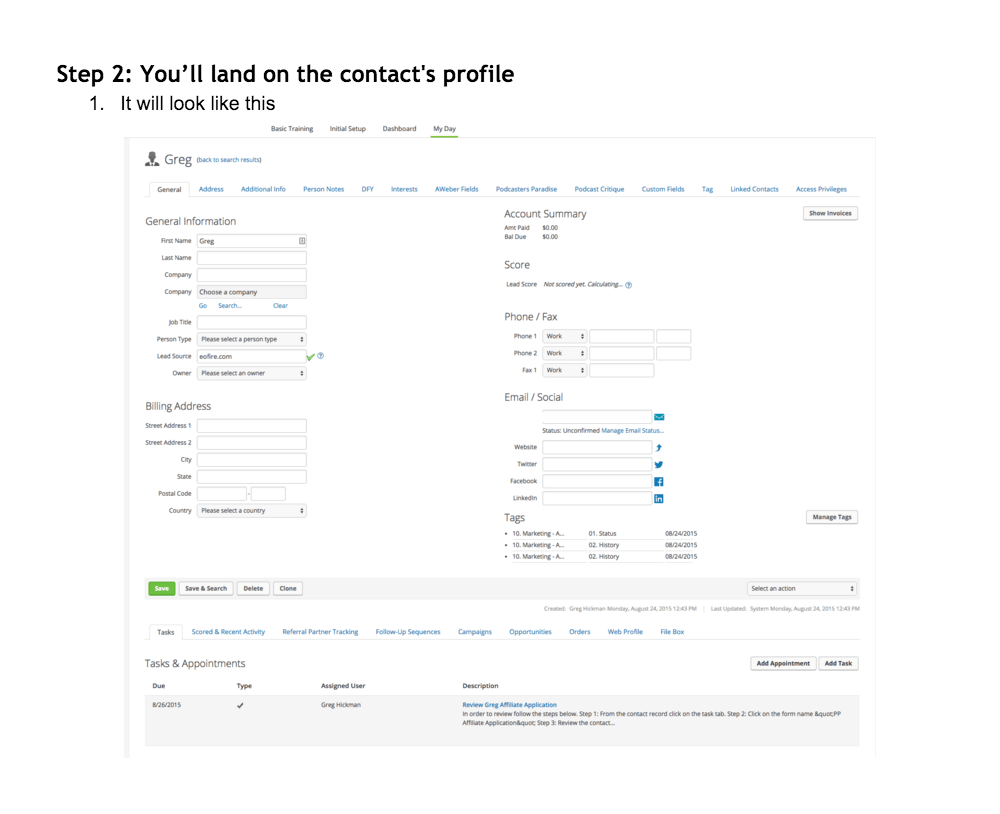
Here’s an example of how I use Google Drive to document systems (great for listing out the actual step and including visuals with it):
Workflowy
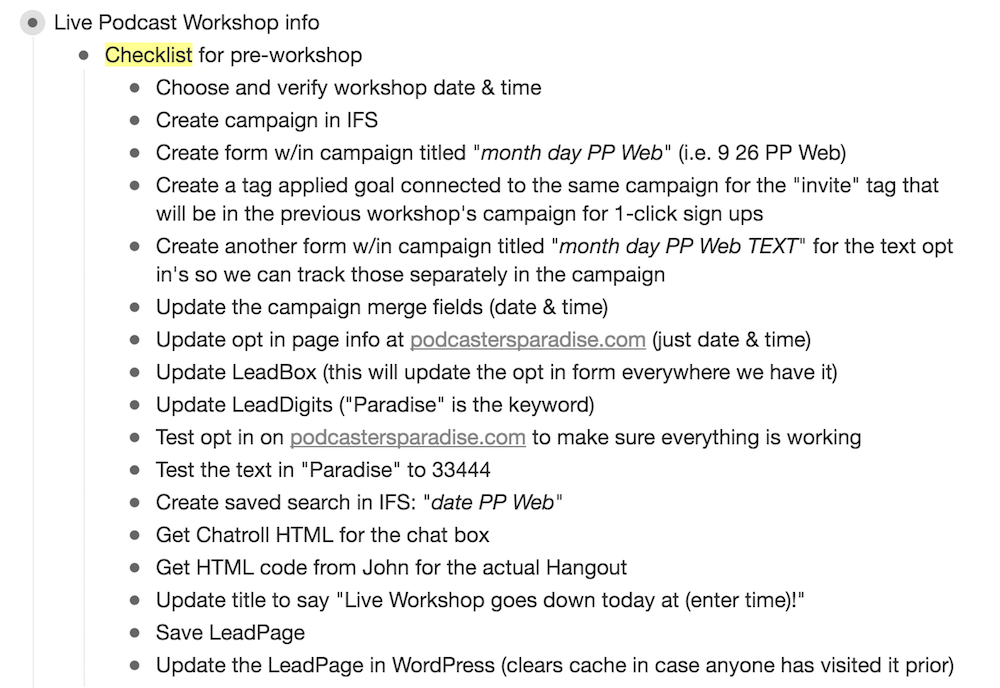
Here’s an example of how I use Workflowy to document systems (great for simple, text-based checklists). Click here for a user case – it will show you just how powerful it truly is.
Advanced tools
Asana
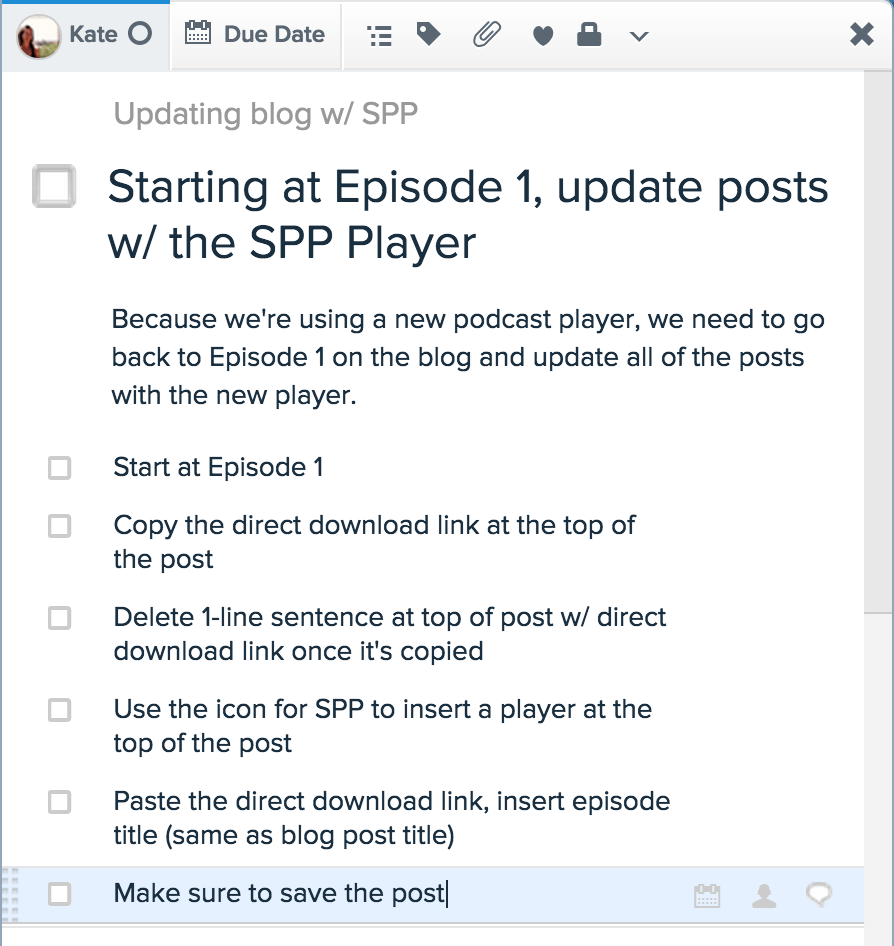
Here’s an example of how I use Asana to document systems (great for listing out each step and then having the ability to assign it to another team member / give it a due date):
SweetProcess
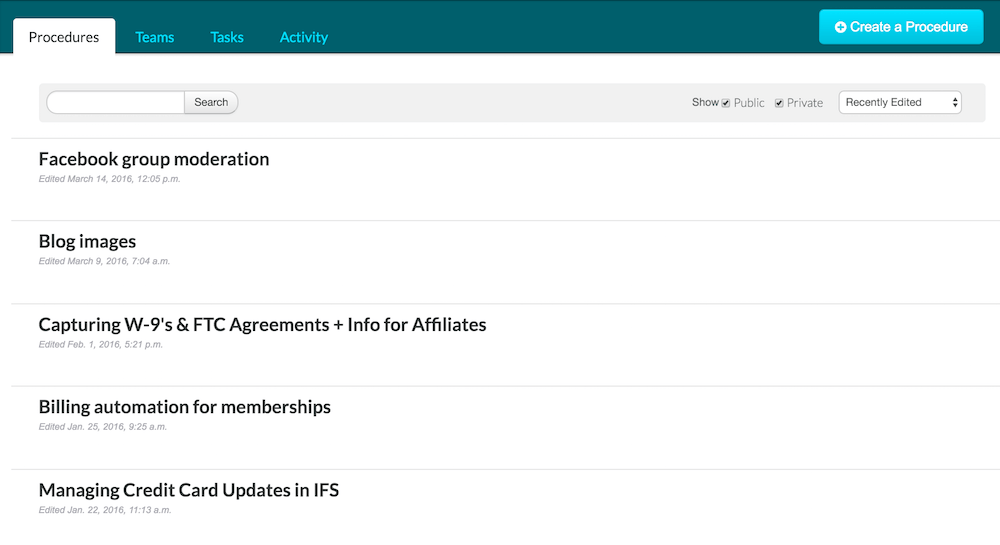
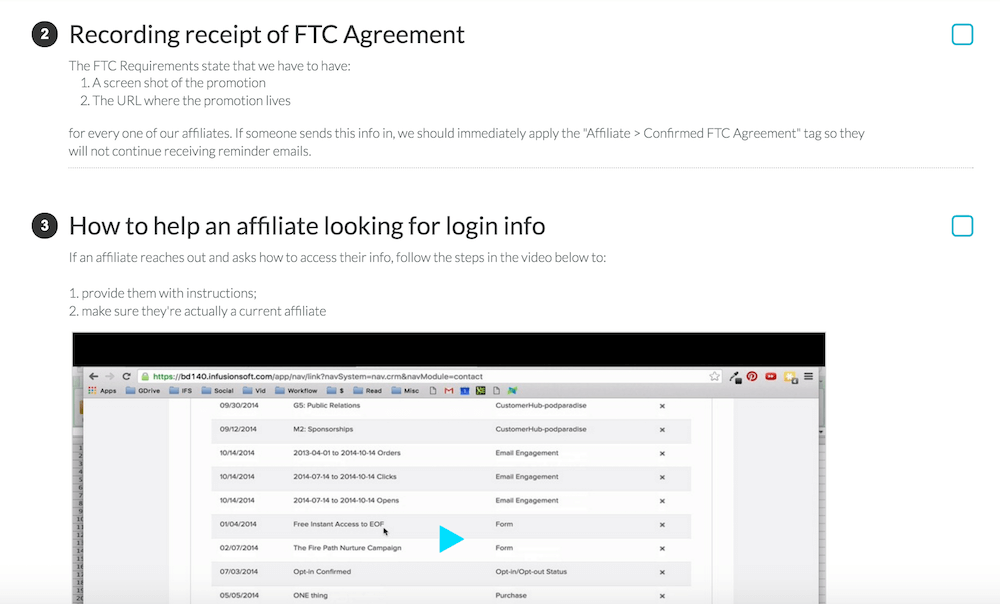
Here’s an example of how I use SweetProcess to document systems (great for listing out detailed step-by-step instructions and including things like links, images and even embedding your training videos within certain steps – also allows you to assign systems to other users):
A look “inside” of a documented system:
Up next
Now that you know how to write out the how for each step within your system, and you’ve gone through actually documenting how your system will work moving forward, it’s time to dive into the maintenance involved.
In the next post and episode we’re going to talk about checkpoints and how you can ensure your systems are running in tip top shape moving forward!
